As the name suggests, a compound microscope uses a combination of lenses coupled with an artificial light source to magnify an object at various zoom levels to study the object.
A compound microscope:
- Is used to view samples that are not visible to the naked eye
- Uses two types of lenses – Objective and ocular lenses
- Has a higher level of magnification – Typically up to 2000x
- Is used in hospitals and forensic labs by scientists, biologists and researchers to study microorganisms
Invented in the late 16th century by Zacharias Janssen, compound microscopes have contributed immensely to the medical field.
It has helped scientists, researchers and doctors in studying the microorganisms, their cells and DNA.
This understanding of the microorganisms has helped scientists in studying how different conditions and diseases attack various cells in our body and several medical advances have been possible, thanks to the compound microscope.
What actually is a Compound microscope?
- Also called as binocular microscope or compound light microscope, it is a remarkable magnification tool that employs a combination of lenses to magnify the image of a sample that is not visible to the naked eye.
- Compound microscopes find most use in cases where the magnification required is of the higher order (40 – 1000x).
- The magnification effect is achieved using the combination of the objective lens (near the sample) and the ocular lens (within the eyepiece).
- The final magnification achieved by the microscope is measured by multiplying both the magnification achieved by objective lens and the magnification achieved by ocular/eyepiece lens.
Working principle
Using a combination of lenses, the working principle of a compound microscope is that a highly magnified image of the specimen is formed at the least possible distance from the distinct vision of an eye that is held very close to the eyepiece of the microscope when the specimen is placed just beyond the focus of the objective lens.
The magnified image is always an inverted and virtual image of the specimen.
Compound Microscope Parts (Labeled diagram)
A compound microscope basically consists of optical and structural components. Within these two systems, there are multiple components within them and they are:
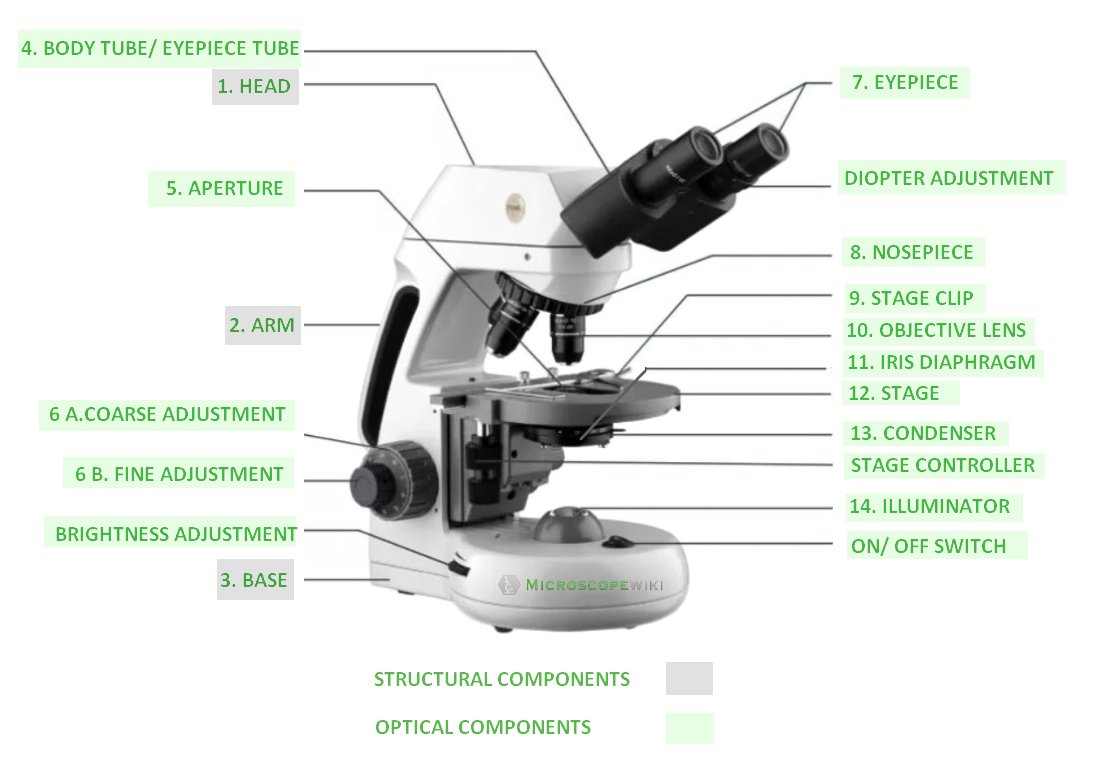
Image : Labeled Diagram of compound microscope parts
See: Labeled Diagram showing differences between compound and simple microscope parts
Structural Components
The three structural components include
1. Head
This is the upper part of the microscope that houses the optical parts
2. Arm
This part connects the head with the base and provides stability to the microscope. Arm is used to carry the microscope around
3. Base
Base is on which the microscope rests and the base houses the illuminator that lights up the specimens.
Optical Components
Objective lenses and Eyepiece lenses are the two major optical systems in a compound microscope. The various optical components include:
4. Eyepiece Tube
The tube aids in keeping the eyepieces in their place above the objective lens. These binocular microscopes typically have a diopter adjustment ring that is used to adjust for the variations in our eyesight in one or both eyes.
5. Aperture
The stage has a hole through which the transmitted light from the base falls on the stage to illuminate the slide. This hole is called the aperture.
6 (a,b). Fine and Coarse Focus knobs
These knobs are used to adjust the focus of the microscope. In the recent past, these two knobs are coaxial housed to offer convenience to the user. Usually, both the knobs are built on one axis with the fine focus knob placed on the outside to enable the users to fine tune the focus.
7. Eyepiece
The eyepiece is at the top of the microscope and it is through this we see the specimen. Eyepieces usually have a magnifying power of 10x and the magnifying power can be increased or decrease depending on the usage by interchanging the lenses.
8. Nosepiece
This is the part that hosts the objective lenses. The objective lenses are mounted on a rotating turret and different lenses can be selected and exposed depending on the user’s requirement.
9. Stage Clips
These clips are used when there is no mechanical stage. The user needs to manually move the slide containing the specimen to view the various sections within the sample.
10. Objective Lens
The most important optical component on the microscope, objective lens can have a magnifying power ranging from 4x to 100x. A combination of about 4 – 5 lenses are used on microscopes depending on the required magnifying power.
Depending on the level of complexity of the specimen, the magnifying power is chosen and accordingly the lenses are used. These objective lenses can be either rear-facing or forward-facing.
11. Iris Diaphragm
It regulates the amount of light reaching the specimen that needs to be viewed under the microscope. It is located under the stage and over the condenser. Modern day microscopes use a combination of condenser and iris diaphragm to control the quantity of light and focus being applied to the specimen.
12. Stage
The specimen that is to be viewed is placed on the stage. Depending on the requirement of working at higher magnifications, a mechanical stage is used to enable the delicate movements that may be required with the specimen.
13. Condenser
It collects and focuses the light from the illuminator onto the specimen. It is housed under the stage and is often used in combination with the iris diaphragm.
14. Illuminator
This is the light source for the microscope and is usually located in the base of the microscope. The modern day microscopes use halogen bulbs operating at low voltage and have the capability to operate at variable lighting settings to facilitate convenience for users.
For instance, the users can increase or decrease the intensity of light being focused on the specimen being viewed. The lighting control is incorporated in the base of the microscope.
15. Condenser Focus Knob
This knob is used to control the movement of the condenser in the process of controlling the light focus on the specimen
16. The Rack stop
This component regulates the movement of the stage lest the specimen gets in contact with the lens thereby increasing the chances of damaging the specimen.
For in-detail information on: Parts of Compound microscope
Frequently asked Questions
Q 1. What is a compound microscope and how does it work?
A compound microscope uses a combination of lenses coupled with an artificial light source to magnify an object at various zoom levels to study the object.
Q 2. What is the principle of compound microscope?
Using a combination of lenses, the working principle of a compound microscope is that a highly magnified image of the specimen is formed at the least possible distance from the distinct vision of an eye that is held very close to the eyepiece of the microscope when the specimen is placed just beyond the focus of the objective lens.
The magnified image is always an inverted and virtual image of the specimen.
Q 3. Why is it called compound microscope?
Because it has multiple lenses that work in conjunction to magnify a specimen
Q 4. What are the 13 parts of a microscope?
1. Eyepiece
2. Eyepiece Tube
3. Objective Lens
4. Stage
5. Stage Clips
6. Nosepiece
7. Fine and Coarse Focus knobs
8. Illuminator
9. Aperture
10. Iris Diaphragm
11. Condenser
12. Condenser Focus Knob
13. The Rack stop
Q 5. What are the 11 parts of a compound microscope?
The most important parts of a compound microscope are:
– Eyepiece & Eyepiece Tube
– Objective Lens
– Stage
– Stage Clips
– Nosepiece
– Fine and Coarse Focus knobs
– Illuminator
– Aperture
– Iris Diaphragm
Q 6. What are the advantages of a compound microscope?
– Ease of use
– Affordable compared to electron microscope
– Can be used to view live samples
– Has an in-built light source that illuminates the specimen
– Relatively small in size and can magnify up to 2000x
Q 7. What are the disadvantages of compound microscope?
– Higher order of magnification is not possible (over 2000x)
– Atoms, molecules and viruses can’t be viewed using compound microscope
Q 8. Can we examine viruses using a compound microscope?
No
Q 9. What are the types of compound microscope?
Different types of compound microscopes include:
1. Biological microscopes
2. Phase contrast microscopes
3. Polarizing microscopes
4. Fluorescence microscopes
Q 10. Which lens is used in compound microscope?
A compound microscope uses two convex lenses. The objective lens – used near the specimen – and the ocular lens that is closer to the eye.
Q 11. Who discovered the compound microscope?
Zacharias Janssen invented the compound microscope in late 16th century
Q 12. What are main parts of microscope?
The three structural components include:
1. Head – This is the upper part of the microscope that houses the optical parts
2. Arm – This part connects the head with the base and provides stability to the microscope. Arm is used to carry the microscope around
3. Base – Base is on which the microscope rests and the base houses the illuminator that lights up the specimens
Q 13. What are the optical parts of microscope?
Objective lenses and Eyepiece lenses are the two major optical systems in a compound microscope.
Q 14. What are the illuminating parts of a compound microscope?
Condenser – It collects and focuses the light from the illuminator onto the specimen. It is housed under the stage and is often used in combination with the iris diaphragm
Q 15. What does a diaphragm do in a microscope?
Diaphragm – It regulates the amount of light reaching the specimen that needs to be viewed under the microscope. It is located under the stage and over the condenser. Modern day microscopes use a combination of condenser and iris diaphragm to control the quantity of light and focus being applied to the specimen
Q 16. What is the use of eyepiece in compound microscope?
The eyepiece is at the top of the microscope and it is through this we see the specimen. Eyepieces usually have a magnifying power of 10x and the magnifying power can be increased or decrease depending on the usage by interchanging the lenses
References: